As I said earlier this week, I try to be personal and unique in my packaging. But I also try to be safe. Here’s a general outline about how I package my ceramics for mailing.
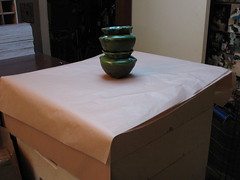 STEP ONE
First up is wrapping the piece, or as in this case each individual piece, in kraft-colored tissue paper. I get my tissue paper from Uline (here) and it is $21 for 480 sheets… so each sheet costs me… I think about four cents. If you consider, too, that I also cut it down into both 5″ and 7″ squares to wrap my soaps in, so each sheet will get between… 12 and 24 squares, that makes the price even lower.
Right now I’m still on the original batch that I bought, although I have bought a second batch (just haven’t needed to open it yet). I’m guessing that one bag of it will last me approximately six months depending on how sales go, making this a good investment.
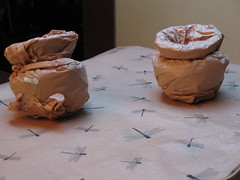 STEP TWO
After that, I do a second layer of wrapping, and in this case with both pieces together, in a kraft colored tissue paper that also has dragonflies printed on them. The dragonfly paper (available here) is a shade more expensive, at $35 for 240 sheets. But again, I also cut some up to wrap up my soaps, so that does help to stretch out the cost. And I like the look that it gives my products. While not full-on wrapping paper, it could be used as wrapping paper should you be giving this as a gift, and at any rate makes the receiver feel like they’re getting a present in the mail.
I think I am just a bit into my second package of this, so it’s probably time to order a third package just so I have backup.
 STEP THREE
Then it is the CERAMICS VS BUBBLE WRAP smackdown! The bubble wrap that I get (from Uline, are you surprised?) comes on a gigantor roll, but has perforations every 12 inches. I struggled before ordering this, because I just wasn’t sure. Should I get the bubble wrap that is already in bag form? That’s hella cute! But then what if my ceramics don’t fit? So I should get something I can cut lengths off of. Should I go with 12 inches across? That seems so small! But 24 inches seems so big!
I finally chose the 12″ roll, perforated every 12 inches, and that was a whopping $22. Considering how many 12×12 sheets I’m getting off of this beast (125), that’s a pretty good price. $0.17 per sheet, I think. Why doesn’t this keyboard have a “cent” symbol? How am I supposed to tell you I’m giving you my eleven cents* worth?!
 STEP FOUR
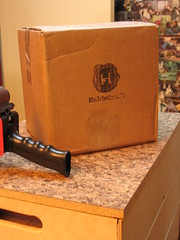
Choose a box. And this is where my years of compulsive box saving pays off! Not really, because I’d broken down all my boxes and thrown them out some time last year… but now I am saving boxes that I get when I order supplies, if they’re not overly large and also in good enough shape to be reused. I also get a lot of Priority Mail boxes for free at the post office; if I’m mailing something pretty heavy, Flat Rate Shipping can sometimes be the better deal. And after a couple months of seeing what size boxes I used the most, I ordered some 7x7x5 boxes from Uline (here). They’re 44 cents each in sets of 25 ($11 total) so again, the cost is negligible. Well, I say that, but if you total everything together it looks like I’m using about $1.50 to $2 worth of supplies for every package I send out. I still think that is a good investment, though. I want my customers to get a nice-looking package, even when I’m reusing something.
 STEP FIVE
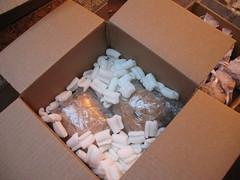
Speaking of re-using, I do reuse packing peanuts when I get them. I also bought a 12 cubic foot bag (yes, from Uline) of the kind of peanuts that dissolve in water (that makes for a large bag). That was $19 and while I feel I use a lot of it (mostly because I want my ceramics to be safe!) I also feel like I’ve hardly scratched the surface of what I bought. Part of that may be that I also reuse peanuts when I get them in supplies I’ve ordered (and fragrance suppliers are almost as nuts about using peanuts as I am).
ANYWAY. Put a small layer of packing peanuts to line the bottom of the box; the bubble-wrapped objects; then add more packing peanuts around them. Give it a little shake to get everything to settle, and add more peanuts if needed to get them to the level of the top of the bubble-wrapped objects.Pause for a moment for the next step before topping off the package.
 STEP SIX
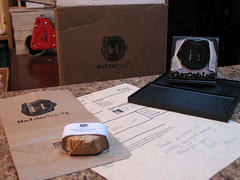
Stampy Stampy! I got a great deal on this 3×3 stamp from Central Florida Office Plus, and I use it to stamp … well, almost anything that will hold still long enough. I have handled bags which I use for sales out of my house, and I stamp those. I just started using essentially lunch bags (guess where I got them) and they were $13 for two bags of them, and there’s 500 of them in a bag. I may never run out. I use them both for smaller sales out of my house, and to stick the packing list and maybe a small thank-you guest-sized bar of soap inside when I’m putting a package together (as you can see from the photo).
It also just occurred to me last week that I could stamp the outside of the box or mailer, which would not only be advertising while the box is travelling (a slim chance that some postal worker somewhere would see the logo and remember to look up my name later, but still); but would also give the recipient an immediate idea of where this package is coming from (when I print out a mailing label from PayPal, it has my name on it and not HaldeCraft – I’m too stupid to figure out how to fix that – so sometimes I wonder if the person looks at the package and has a moment of errr?).
STEP SEVEN
Here’s our package, all ready to go out! After I have put the packing list in the box, I fill it the rest of the way up with packing peanuts, give it a good shake to get everything moved around and settled, shove in some more peanuts if need be, and then seal it up. Next is weighing the package and printing out the postage and mailing label, and taking this little goody to the post office!
There are some variations on this, such as if they’re also getting soap with their ceramics – if that’s the case I layer peanuts between the ceramics on the bottom and the soap on the top. If they’re just getting one bar of soap I have bubble mailers that I use. I can fit as many as three bars in a mailer, as long as they’re not odd-shaped. If they’re getting more than three bars, or odd shapes, I will use the appropriate sized box, but don’t wrap them like I do the ceramics as the soap is already wrapped. Although saying that, I have been known to wrap the soap going into a mailer in an extra layer of tissue paper just for that extra bit of padding.
So that is pretty much the story of what your package might go through to get from me to you – please feel free to ask any questions if I didn’t mention something you’re curious about!
* Old Homicide: Life on the Street inside joke.
I saw something interesting at Staples today — a paper version of bubble wrap. It’s $11 for 26 feet (yikes!) but it might be something to keep an eye on. Here’s the link: http://www.staples.com/Caremail-Greenwrap/product_737645?cmArea=SC1:CG16:DP1784:CL141647
It’s even kraft colored! Maybe that’s your new premium shipping extra charge option. Opening your soap club boxes always feels like getting a present — for that matter, so did opening the regular shipments. Hee! I can hardly wait for Christmas!